How to Play Sublight
Movement, boost, arcs, turrets, salvage, and reading the sector map.
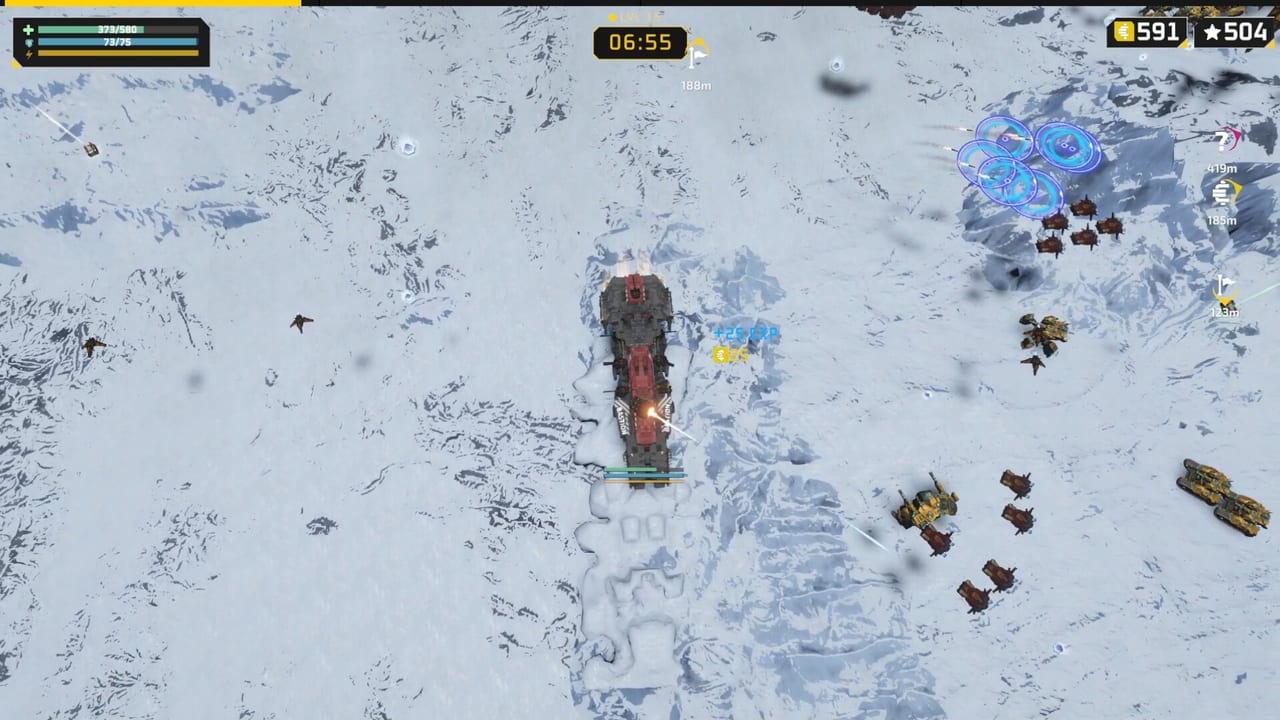
Sublight plays like a bullet heaven only until you notice your guns refuse to shoot behind the ship. Combat is built on captain movement, boost, weapon firing arcs, and turret placement — not on parking in a XP circle. This page is the systems manual that sits between Getting Started and Best Builds. Master it before you blame a weapon tier for a wipe.
Early Access launched September 15, 2026 as a single-player Steam title for Windows and Linux. Controls below match current gameplay footage and launch marketing: move with WASD or arrow keys, boost with Shift. Exact keybinds may offer remapping in options; if your build differs, treat the verbs (move, boost, place, salvage) as the truth and the keys as defaults.
The mid-page gameplay video shows a full warship clear so you can see arcs, boost turns, and salvage greed in motion before you memorize the drills below.
Core controls
- Move — WASD or arrow keys. Strafing matters because arcs are directional; sliding your hull can bring a silent flank gun online without spending a level-up.
- Boost — Hold or tap Shift (per your settings) to accelerate. Boost is for rotating the ship’s facing into a better arc, escaping a rebel volley, or cutting through a wreck field to grab salvage before alien swarms close. Do not boost in a straight line forever — you will fly out of your own turret coverage or into a boss telegraph.
- Turret / weapon management — Place and manage guns inside firing arcs on your warship. Each weapon covers a cone or sector relative to facing. Repositioning the ship rotates those cones through the battlefield.
- Level-up choices — On level, pick weapons and passives that reinforce one plan. See build philosophy on Best Builds.
- Map / nodes — Navigate sector nodes between fights. Node choice affects pacing, reward risk, and how soon you meet elites or bosses.
If a control prompt in-game differs after a patch, trust the on-screen prompt and update your muscle memory; the arc and salvage rules below are the durable skills.
Firing arcs are the real tutorial
Every mounted weapon cares where the hull points. A chaingun with a forward-biased arc will not save you from a pack that wrapped your stern. A broadside-heavy loadout wants you to present the correct side to the densest threat, then boost-adjust when that threat slides. Practice runs should include deliberate “turn the ship, watch which guns light up” drills before you chase rare barrage drops.
Turret placement multiplies that lesson. Crowding every hardpoint into the same cone wastes coverage. Spreading guns without a damage identity wastes level-ups. Aim for intentional overlap on your primary threat lane plus enough side coverage that a single flank spawn does not require a full 180-degree panic spin.
Alternative ship loadouts change hardpoint layouts. The nine Early Access ships (including missile-frigate roles such as Shortsword where named by the developer, plus starter battleship-style platforms and other gun hulls) teach different arc puzzles. Swap hulls when you feel stuck mechanically, not only when a tier list shifts — then confirm rankings on the tier list.
Salvage, XP, and greed
Defeated enemies leave salvage that fuels experience and leveling. Salvage pulls you into wreck fields that are often still contested. The skill is routing: clear enough of a pack that the pickup path is safe, boost in, scoop, and rotate arcs back toward the next wave. Greed deaths usually look the same — you leave your arc cone pointing at empty space while a rebel frigate line or alien swarm enters from the dark side of the hull.
Leveling mid-run is where Sublight’s bullet-heaven DNA shows. New weapon types (autocannons, railguns, chainguns, barrage systems among the sixteen-plus launch options) and dozens of passives appear as choices. Prefer stacking a status identity early: Ignite builds toward a five-stack burn plan; Cold builds toward twenty stacks and freeze utility. Mixed random picks feel powerful for one node and collapse when a boss demands a coherent DPS profile. Details and synergies live on Best Builds.
Reading the map and pacing a run
Sector maps present nodes that sequence combat, rewards, and risk. Early nodes are for establishing arc coverage and a weapon family. Mid-run nodes are for doubling down on passives that multiply that family. Late nodes and bosses ask whether your facing habits and boost discipline survive telegraphed pressure. Weekly rotating level modifiers can rewrite pacing — a modifier that favors close aggression rewards different node routes than one that punishes lingering in wreck fields.
Two enemy factions define the launch bestiary: rebel fleets and alien swarms. Rebels tend to read as structured fleet pressure; swarms punish slow rotation and weak side arcs. Learn both patterns before you specialize a build so you do not overfit to one faction’s spawn rhythm.
Bosses and the thirty-minute Hunter window
Multiple bosses appear in the Early Access slice. Boss mechanics punish static parking and reward the same skills you practice on trash: present the right arc, boost out of telegraphs, salvage only on safe windows. After roughly thirty minutes, a Hunter flagship can spawn and escalate the run. That encounter is not “more XP with a bigger HP bar” — it is a gear check on positioning and build coherence. Study Hunter Flagship and Boss Tips before you treat long runs as default farming.
Practice drills that actually help
- Arc lamp drill — On a quiet node, rotate in place and call out which weapons are online at each facing. Build muscle memory for blind spots.
- Boost-to-arc drill — Intentionally let a pack spawn on your weak side, then boost-turn until your primary cone covers them without drifting into a second spawn.
- Salvage loop drill — Clear, scoop, reseat arcs, repeat. Time how long your primary cone faces empty space during the scoop.
- Modifier reading — Before each session, read the weekly modifier and name one playstyle change out loud (range, aggression, salvage greed).
- Short-to-long progression — Nail clean sub-twenty-minute runs before chasing Hunter-capable thirty-plus minute clears.
How this page links the rest of the wiki
New players should finish Getting Started for unlock and demo-versus-EA context, use this page for mechanical literacy, then specialize with Best Builds and late-run survival on Hunter Flagship. The parent Guides Hub lists every walkthrough. When ship or weapon rankings matter more than “how,” open the tier list. When the roadmap drops a new faction or mission type, return here and re-test arcs against the new spawn patterns rather than copying an outdated loadout screenshot.
Sublight’s unique pitch is that weapon firing arcs and ship positioning matter. If a tip ever tells you to ignore facing, discard it. Everything durable on this wiki — builds, bosses, Hunter prep — assumes you can move, boost, and aim the hull on purpose.
Frequently Asked Questions
Quick answers to the most common Sublight questions.
What are the default Sublight movement controls?
Move with WASD or arrow keys and boost with Shift, based on current gameplay footage. Check in-game options if you remapped keys after a patch.
Why do my weapons sometimes stop shooting enemies behind me?
Weapons are limited by firing arcs relative to ship facing. Rotate or boost-turn so the gun’s cone covers the threat, or place turrets to cover more sides.
How does salvage work?
Defeated enemies drop salvage that grants XP for mid-run leveling. Route safely through wreck fields so you do not leave your primary arc facing empty space while packs spawn.
When does the Hunter flagship appear?
After roughly thirty minutes on deep runs the Hunter can spawn and escalate. Learn arcs and a coherent build first; then read the Hunter Flagship guide.
Should I learn controls before builds?
Yes. Best Builds assumes you can present arcs and salvage without panic. Getting Started covers unlocks; this page covers the verbs of combat.